


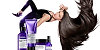

The Wet Look hairstyle, known as the Wet Look, emerges as a top trend this spring season. Whether you have long, medium-length, or short hair, we bring you a guide on how to master this modern yet easily achievable hairstyle in just a few minutes. The key is a sleek, wet effect on the top of the head, while the rest of the hair looks natural. Choosing the right products, specifically designed for the wet look, is crucial.

Step-by-Step Guide to the Wet Look
-
Hair Preparation - First, divide your hair into four sections. Curl them with a medium to large diameter curling iron to create waves, then set with a flexible, matte finish hairspray Schwarzkopf Professional OSiS+ Velvet. This method is suitable for long and medium-length hair; for short hair, you can adjust or skip this step.
-
Hair Styling - After curling or preparing, carefully comb your hair back. For short hairstyles, focus on achieving a smooth styling.
-
Gel Application - Divide the hair at the top of your head into two sections. Starting with the section further from the forehead, apply a wet look gel No Inhibition Wet Hard Gel, such as Tecni.Art Wet Domination Extreme Splash, using a comb for even distribution.
-
Finishing Touches at the Forehead- Then, attend to the dry strands at the forehead. Use the same method of gel application as in the previous steps. For short hairstyles, you can adjust this step to match the length and style of your hair.
-
Final Fixation - Set the hairstyle with a glossy hairspray for the perfect wet effect, such as Goldwell Salon Only Hair Lacquer Super Firm Mega Hold.
TIP: If you're short on time, you can simply straighten the lengths of your hair.
Wet Look: A simple step to achieve the irresistible spring trend that adds the right flair to any hair length.